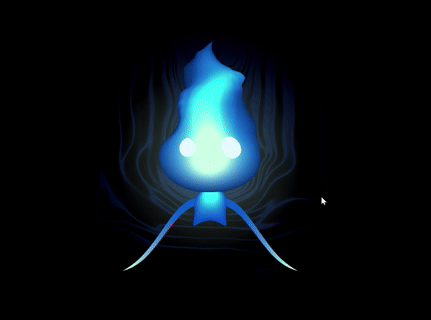
Inspired by the Will-o’-the-Wisps from Brave, I created my own wisp using procedural noise tools in WebGL and Javascript.
Check out my live demo HERE and my source code HERE.
Breakdown
WebGL Vertex and Fragment Shaders
- I broke the wisp down into components, the fiery head, body, left/right arms, and surrounding effects. Each component has its own vertex and fragment shader.
- Each part of the main wisp began as an icosphere, to which I deformed using different fragment shaders.
- I animated all body parts, in addition to the surrounding effects. The fire and effects colors also change with respect to time.
Creating the Wisp
- Wisp Fire (Head)
- First, I used vertex vertical position as an input to the gain function, deforming the sphere into a tear-drop shape.
- I then added a low-frequency, high-amplitude displacement using trigonometric functions, bias, and Perlin noise to create the overall fire structure and movement.
- I created smaller flares to add more texture on the surface by implementing a higher-frequency, lower-amplitude layer of fractal Brownian motion (FBM).
- I colored the fire by combining the camera’s position with the smoother step function, ensuring that the wisp’s center stays the same color regardless of the camera angle. This gives the wisp its glowing effect.
- The eyes were painted on by specifiying their origins and then coloring fragments that fell within their radius.
Wisp Body
- I added symmetric pulsing movements in the body using Perlin noise.
- I also achieved the illusion of legs by dividing the vertical vertex position by the cosine of its horizontal position.
Wisp Arms
- The arm curl uses bias and trigonometric functions, creating the look of waving arms while ensuring that the shoulder/arm attachment remained relatively stable.
Surrounding Effects and Interactivity
- The surrounding effects were created by painting noise onto an enlarged icosphere that serves as the “background”. View-dependent interpolation allowed me to ensure that the noise remained behind the wisp.
- This part was the most challenging. I ended up referencing a ShaderToy project to create a wispy effect using simplex noise. I distorted the noise in the same general way as my wisp head and linearly interpolated with the background color (black) to create the emanate and fade effect.
- The wisp’s colors, turbulence, and size can be customized (and reset) in the TypeScript UI.